Categories
News

Dry Weather Flow

With all the dry weather we have been having the sewer flows are low. This low flow causes debris and rags to build in the sewer system as the flow is insufficient to push these down the sewer pipe into the wet well storage tanks. As soon rain falls the debris and rags all flow into the well all at once instead of a slow constant rate. This sudden barrage of rags in most cases will overpower the pumps and cause blockages. With the Deragger II’s® patented real time detection, it can detect the blockage before it blocks the pump. The pump will then be put into a clean cycle to break up the rag and allow it to pass forward to the waste water treatment plant where it is dealt with correctly.
dry weather clogged pump


Bookmark and Share

Categories
News

How do I get anti-ragging on a Soft Start?

The Deragger II® is simple to integrate into any existing starter sections. In this entry we will be demonstrating the integration of the Deragger II® with a soft starter. This will demonstrate how you can get anti-ragging the easy way. Our device is perfect where a VSD replacement would be a costly alternative.

The device takes a run signal to start. This is taken from the start signal on the soft start. Remove the wires from the soft start and put them in the common and Input 1 on the Deragger II®. A volt free contact from the reset push button is wired into Input 3.

The Deragger II®’s patented anti-ragging technology relies on a reversing contactor to assist with the cleaning operation of three phase pumps. For retrofit purposes we recommend fitting a forward and reverse contactor on the output of the Soft start. We recommend Schneider contactors due to the slim profile.

The contactors are connected as shown below:
Softstart Deragger Installation
Use the N/O contacts of the forward and reverse contactors in parallel to start the soft start. This ensures the motor is connected before running the soft start. The Deragger® will then take control of the soft start via the forward and reverse contactors. The Deragger II® will allow the motor to coast to a stop before changing direction.

Next the overload is removed and the existing fault wires (N/O, N/C) are wire into output 3 and 4 of the Deragger II®. This is how to interface the unit with the panel’s trip circuitry and any telemetry that may be present.

The unit is now installed and ready to commission.


Bookmark and Share

Categories
News

How do I get anti-ragging on an existing Star Delta starter?

How do I get anti-ragging on an existing Star Delta starter?

The Deragger II® is simple to integrate into any existing starter sections. In this entry we will be demonstrating the integration of the Deragger II® into Star/Delta starters. This will demonstrate how you can get anti-ragging the easy way. Our slimline device (45mm) is perfect when space is a premium and with its patented clean technology, is the perfect solution for this type of problem.

The device takes a run signal to start. This is taken from the A1-A2 coil of the existing main contactor. Remove the wires from the existing contactor and put them in the common and Input 1 on the Deragger II®. A volt free contact from the reset push button is wired into Input 3.

The Deragger II®’s patented anti-ragging technology relies on a reversing contactor to assist with the cleaning operation of three phase pumps. For retro fit purposes we recommend fitting a forward and reverse contactor. These are placed upstream of the 3 existing contactors. We recommend Schneider contactors due to the slim profile.

The contactors are connected as shown below:
Deragger II Star Delta Connection
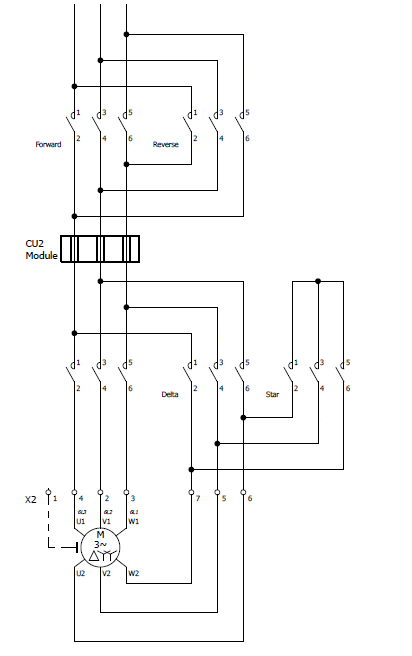
Use the N/O contacts of the forward and reverse contactors in parallel to energise the existing line contactor. This ensures the correct timing of the star/delta change over is maintained.

Next the overload is removed and the existing fault wires (N/O, N/C) are wire into output 3 and 4 of the Deragger II®. This is how to interface the unit with the panel’s trip circuitry and any telemetry that may be present.

The unit is now installed and ready to commission.


Bookmark and Share